Deploying your Python Script to Lambda - Part 2
Posted on Wed 26 February 2020 in Python_Automation
This is the second article in the 2 part series "Creating a Python Love Poem". This Article covers deploying your Python script to AWS Lambda Service.
- Setting Up Pelican Site Generator
- Deploying your Python Script to Lambda <-- this article

In Part One, our code has been tested and is ready for deployment. With the advent of serverless computing, it would be a waste of resources to run a task as small as this. Here is Where AWS Lambda comes in.
AWS Lambda Service is a serverless cloud computing service that runs small pieces of code/ functions without the need for a server making you only pay for the compute time you consume. Also, Aws lambda service gives a million requests for free in a month. making it perfect as we would be making less than 100 requests for this project
Creating your Lambda Function
You'll need to have an AWS account to run this project.
- Sign in to your AWS console.
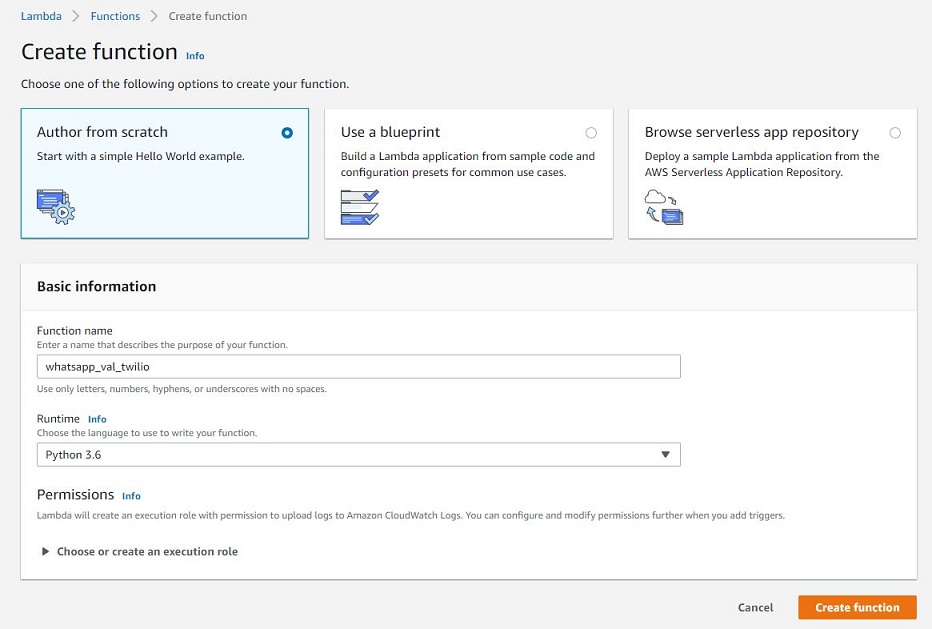
- Under Services, Select Lambda service under the Compute Category
- Click on
Create Function - Enter the Name of the New Function
- Specify the Runtime Environment of the Function
The Function runtimes are the languages and versions supported by AWS and are used for the execution of the function. Your function runtime version should be similar to your development environment. Our script is written in python and we can check the closest version by running the following command on our development terminal
$ python --version

Python 3.6.2
Select the closest Runtime to your Python version to your development environment
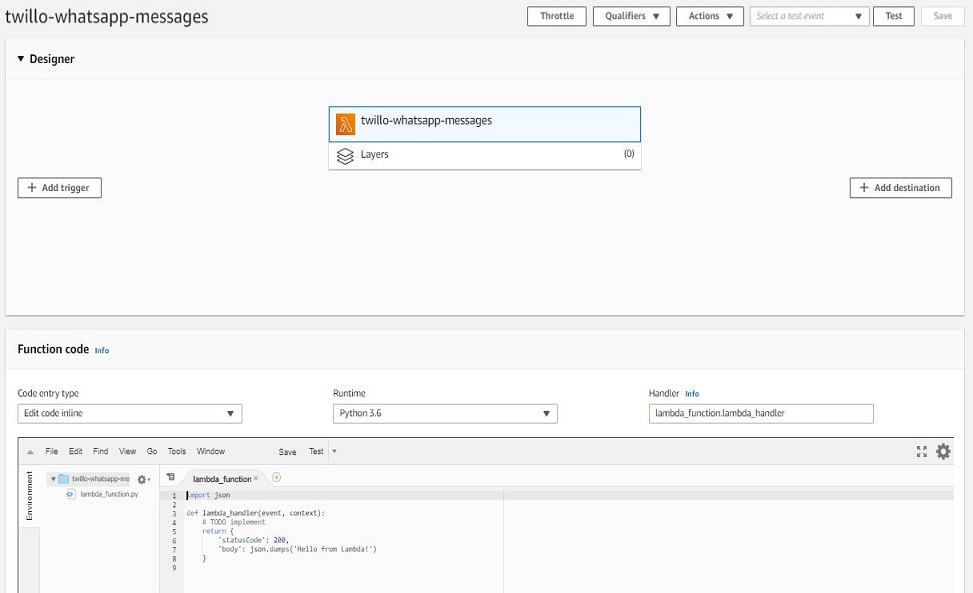
You are now redirected to a Designer page which shows you an overview of your function. The Designer Page is used for function configuration such as adding Event Triggers, Layers and other Actions related to other AWS services. Below the Designer, you have the code Editor which displays a default function structure, the code editor allows you to make changes to your function on the AWS console.
import json

def lambda_handler(event, context):
    # TODO implement
    return {
        'statusCode': 200,
        'body': json.dumps('Hello from Lambda!')
    }
The Lambda function takes in a function handler lambda_handler(event, context) which has 2 arguments event and context. The event parameter is used to pass data into your function, while the context provides the runtime information to the function. The Handler acts as an entry point for your function, which is similar to the if __name__ == "__main__" line in python used to ensure a block of code executes when a script is run on the command-line. The Handler also returns JSON-formatted data.
Installing Dependencies
AWS provides a list of available Python libraries that can be imported into your project, however you start to encounter issues when you need libraries that are not available by default such as the Twilio and BeautifulSoup Libraries used in our script. To make deployments easier AWS lambda service allows users to install libraries locally and upload as Lambda Layers.
Lambda Layers
A Lambda Layer is a ZIP archive that contains libraries. Layers are very useful if you have various Lambda functions using the same dependencies since the dependencies will be imported into the Lambda function at runtime. The main benefit of this is that you utilize your dependencies more efficiently, resulting in smaller deployment bundles that make deployments faster.
To create a Layer, The Python dependencies will be installed to a directory, which will then be zipped and uploaded as a Lambda layer.
Note, when a Layer ZIP archive is loaded into AWS Lambda, it is unzipped to the /opt folder. The Libraries should be placed inside a python directory to enable the Python lambda function to import the library.
Create a directory named python to hold your dependencies
mkdir python
Install all dependencies to the directory with the -t flag
pip install <dependency-name> -t python
pip install Twilio requests -t python
Compress the python directory into a zip file
N.B. Install zip utility if not present on your system. apt-get install zip
zip -r twiliodeps.zip python
to upload, you can use the AWS CLI or the AWS console
aws lambda publish-layer-version --layer-name twiliodep --zip-file fileb://twiliodeps.zip
The Created Zip file can also be uploaded on the AWS Console
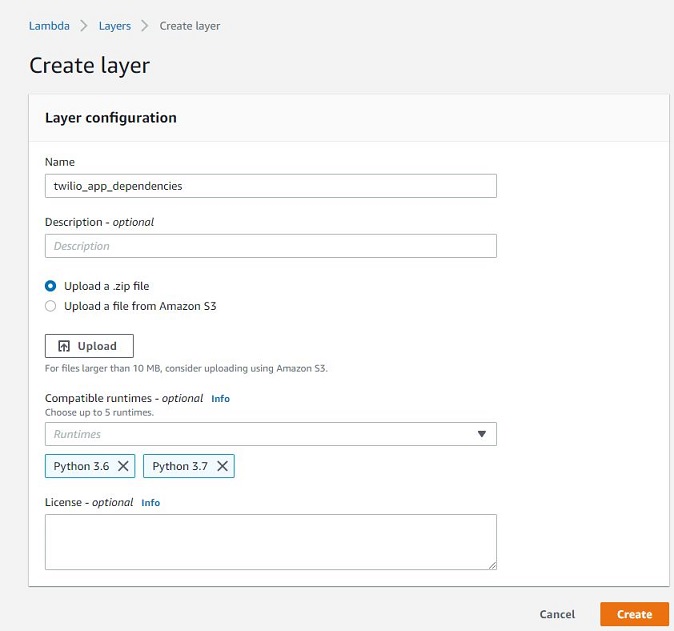
- On your Lambda Service Console, Click on Layers
- Give your Layer a Unique Name and a Description (optional)
- Select Upload a .zip file
- Click Upload a File and Select your Zipped File
- Choose Compatible Runtime (similar Runtime to your development environment)
- Create
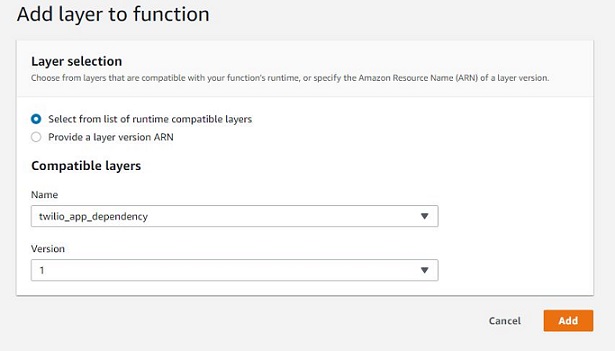
After creating and Uploading your Layers, the dependencies can be imported in the script
- On the Designer, Click on Layers,
- A Layers section will appear below the designer.
- Click
Add a Layerwhich takes you to a page where you can select a layer to add - Select the Layer you earlier created and Add.
On adding the Layer, the Designer shows the number of layers attached to your function
we can then test if layers are imported by importing our dependencies into the function
import json
from twilio.rest import Client
from bs4 import BeautifulSoup as bs

def lambda_handler(event, context):
    # TODO implement
    return {
        'statusCode': 200,
        'body': json.dumps('Hello from Lambda!')
    }
Save the function to add the dependencies and click on the test button above the designer.
On your first run, you are prompted to create a default test event. Accept the Default Settings as we do not have any event being passed into our function.
Click the Test Button again
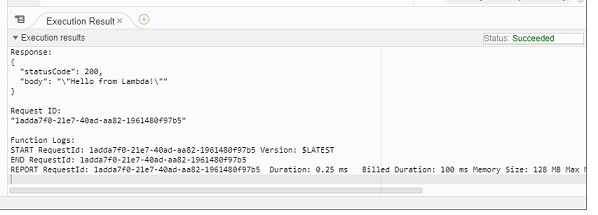
if the layer was properly uploaded, the console returns a succeeded Status
Adding our code to the Lambda Function
The functions are added above the main lambda handler, while the body for running our code will be included in the handler which is called at runtime. We also wrapped our code in a try/except block to catch errors raised.
Our new code is
import json, sys, requests
import urllib.parse, boto3, random
from bs4 import BeautifulSoup as bs

def getMessage():
    ...


def _get_request(url, payload):
    ...

transUrl = 'https://translation.googleapis.com/language/translate/v2'
randomLangUrl = 'https://translation.googleapis.com/language/translate/v2/languages'

def lambda_handler(event, context):
    # TODO implement
    try:
        client = Client(twiliosid, twiliotoken)

        ...

        transResponse = _get_request(transUrl, transPayload)
        msg = transResponse.get('data').get('translations')[0].get('translatedText')

        msg = translate('I Love You', 'en', dest_language, gtranslateApiKey)
        randomQuote = getMessage()
        fulltextmsg = randomQuote + " \n P.S. " + msg

        loved_ones = {'seyi': '+26878514450'}

        for key, value in loved_ones.items():
            message = client.messages.create(
                                        body="Dear " + key + ",\n" + fulltextmsg,
                                        from_='whatsapp:+14155238886',
                                        to='whatsapp:' + value
                                    )

        return {
            'statusCode': 200,
            'body': message.sid
        }
    except:
        return {
            'statusCode': 400,
            'body': 'Error, Bad Request'
        }
Managing Secrets on Lambda
In the previous part, we saw the importance of managing application secrets and were able to secure our secrets by using the .dotenv package and OS environment variables. We would be using the AWS Parameter Store to securely manage our API keys
AWS Systems Manager Parameter Store provides secure, hierarchical storage for configuration data management and secrets management. You can store data such as passwords, database strings, and license codes as parameter values.
We would be storing our API keys by encrypting them in the parameter store and only importing it to our script during runtime.
- Sign in to your AWS Console and select an appropriate region.
- Under Services, click on Systems Manager.
- on the left menu pane, scroll down to the Parameter Store
- Click on Create Parameter in the new window
There are 3 types of Parameters
- Strings
- Secure String which would be used to encrypt our API keys using a KMS key that can be decrypted only by a permitted user
- String List
We then proceed to create parameters for our google and Twilio API keys
- Enter the Name of the keys you want to store. Example GAPIkey
- Enter the Description(Optional)
- Select Secure String as Parameter Type. Under KMS key source select My current account if you want to use the KMS key present in your account.
- From the drop-down list select the KMS Key ID you want to use to encrypt the values.
- Enter the Value which you need to store and click on the Create Parameter.
After creating your keys, your parameter store should contain all 3 keys
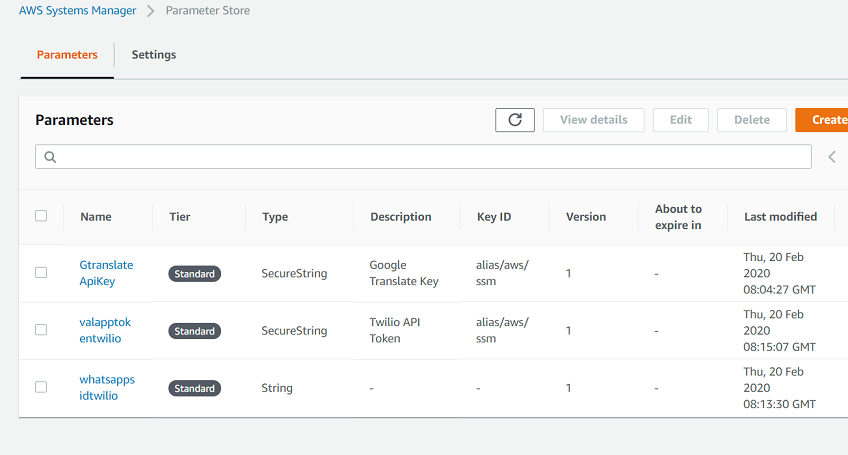
You can also go into a key and view the decrypted value if signed in as a permitted user
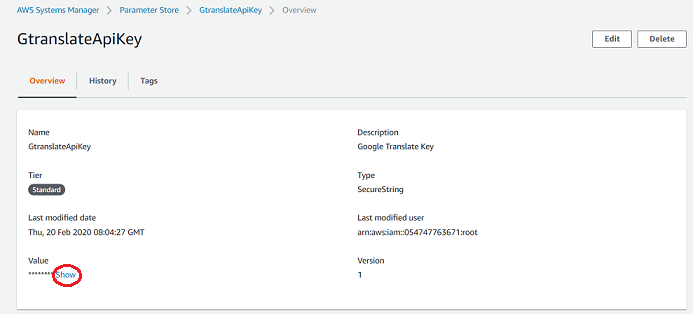
A Faster approach to creating our parameters is by using the AWS CLI.
Make sure your AWS CLI is configured to use your credentials
aws configure
Creating SecureString Parameter
aws ssm put-parameter --name googleTranslateKey --type secureString --value <your-key>
Creating String Parameter
aws ssm put-parameter --name twiliosid --type string --value <your-key>
Retrieving the Keys
aws ssm get-parameter --name googleTranslateKey
this returns a python dictionary which contains the string if the value is a plaintext string, while it returns an encrypted key for secureString
to decrypt, pass the with-decrypt flag
aws ssm get-parameter --name googleTranslateKey --with-decrypt
Incorporating into our code The keys will be imported into our function using the AWS SDK boto3, which allows us to make use of other AWS services such as s3, parameter store and Amazon EC2 in our function.
import boto3

ssm = boto3.client('ssm')

def _getParameter(someString):
    paramObject = ssm.get_parameter(Name=someString, WithDecryption=True)
    return paramObject['Parameter']['Value']
We import the boto3 library, then create a client for the ssm service.
The next line creates the _getParameter function which takes in a Parameter name, and returns the decrypted value using the ssm client that was created.
Retrieving the Keys with the _getParameter function in the Lambda handler
gtranslateApiKey = _getParameter('GtranslateApiKey')
twiliotoken = _getParameter('valapptokentwilio')
twiliosid = _getParameter('whatsappsidtwilio')
Adding Roles to your Function
Save and Run your code after including the Secured keys, We however, get an AccessDeniedException when the script tries to access the keys we created

The error occurs because we initially chose the default execution role which only provides access to the Lambda service and we now have included the System Manager and KMS service into our function, and the default Role does not have permission to run those services. we would work around this by creating a new IAM role which gives our function access to the KMS service to decrypt our secret API keys
IAM Roles
"IAM roles are a secure way to grant permissions to entities that you trust"
such as an AWS service that needs to act on resources in your account to provide its features.
Creating Roles in AWS
- Navigate to the IAM Service
- Click Create Roles
- Select AWS Service as the type of trusted entity
- Select Lambda Use Case and Click on Permissions Button
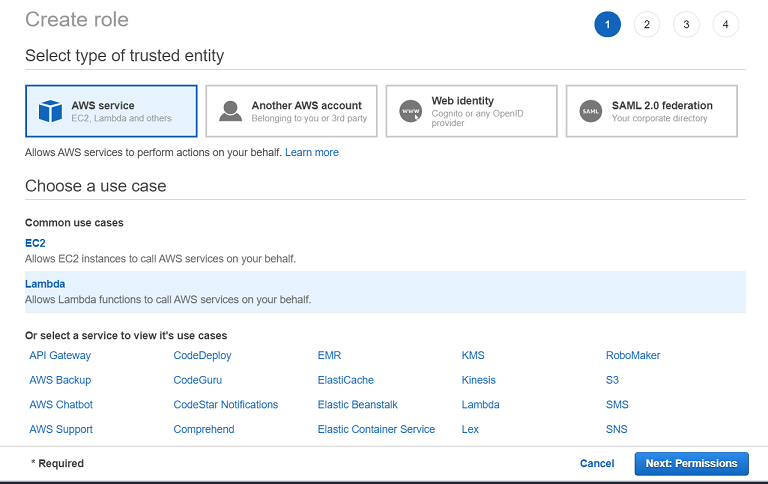
You will be prompted to create a policy that will be attached to the role being created. Policies are Objects that define permissions for specific AWS resources and services.
We would be creating Policies and attaching the Listed Permissions
- Service: Lambda
- Action: Read
- Resources: All
This will grant the policy user access run the Lambda function, Also add the KMS service with Decrypt access for decrypting our keys and System Manager service with the ReadParameters Access for reading keys from the Parameter Store
- Service: KMS
- Action: Decrypt
- Resources: All
- Service: System Manager
- Actions: Read (getParameter and getParameters)
Review Policy and Give a Policy Name
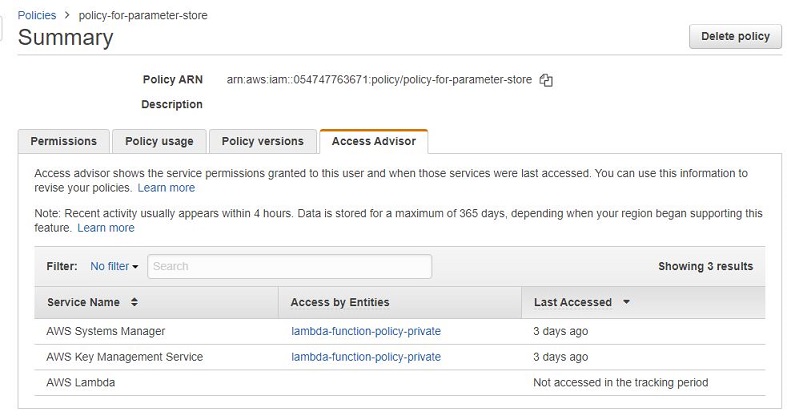
After Creating your Policy, Navigate to your Role tab to Attach the Policy that was created.
Also, Give the Role a name and Save Role.
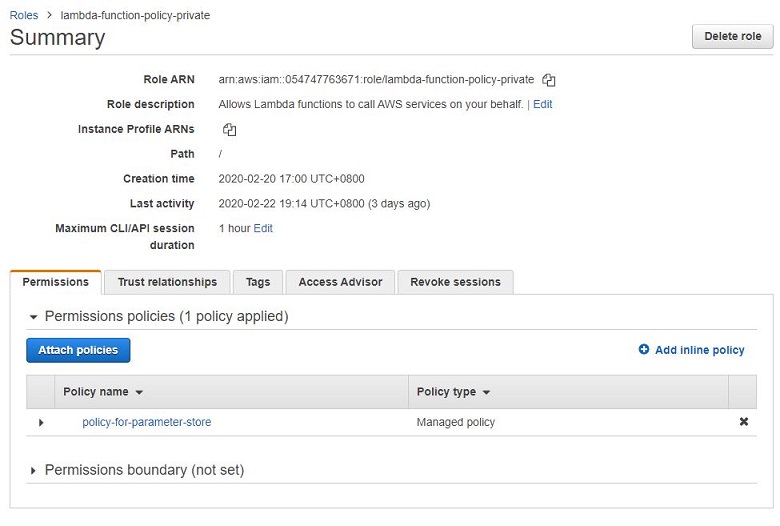
Adding the New Role to the Lambda Function
Head back to your Function Designer Page, under the Execution Role Section, Select Choose Existing Role. Several Roles are Populated into the existing Roles Field, Search and Select the Role that you recently created for the Lambda Function.
Our final code.
import json, sys, requests
import urllib.parse, boto3, random
from twilio.rest import Client
from bs4 import BeautifulSoup as bs

ssm = boto3.client('ssm')


def getMessage():
    url = 'https://www.serenataflowers.com/pollennation/love-messages/'
    res = requests.get(url)
    try:
        res.raise_for_status()
    except requests.exceptions.HTTPError:
        sys.exit(1)
    soup = bs(res.text, features="html.parser")
    listOfMessages = soup.select('.simple-list li')
    textMessages = [item.text for item in listOfMessages]
    randomquote = random.choice(textMessages)
    return randomquote

def _get_request(url, payload):
    r = requests.get(url, params=payload)
    try:
        r.raise_for_status()
    except requests.exceptions.HTTPError:
        print('Error: the Request failed.')
        sys.exit(1)
    response = json.loads(r.content.decode('utf-8-sig'))
    return response

def _getParameter(someString):
    paramObject = ssm.get_parameter(Name=someString, WithDecryption=True)
    return paramObject['Parameter']['Value']

transUrl = 'https://translation.googleapis.com/language/translate/v2'
randomLangUrl = 'https://translation.googleapis.com/language/translate/v2/languages'


def lambda_handler(event, context):
    try:
        gtranslateApiKey = _getParameter('GtranslateApiKey')
        twiliotoken = _getParameter('valapptokentwilio')
        twiliosid = _getParameter('whatsappsidtwilio')

        client = Client(twiliosid, twiliotoken)

        randomLangPayload = {'key': gtranslateApiKey}

        destResponse = _get_request(randomLangUrl, randomLangPayload)
        dest_language = random.choice(destResponse['data']['languages'])

        transPayload = {
            'source': 'en',
            'target': dest_language,
            'key': gtranslateApiKey,
            'q': urllib.parse.quote('I Love You')
        }

        transResponse = _get_request(transUrl, transPayload)
        msg = transResponse.get('data').get('translations')[0].get('translatedText')

        msg = translate('I Love You', 'en', dest_language, gtranslateApiKey)
        randomQuote = getMessage()
        fulltextmsg = randomQuote + " \n P.S. " + msg

        loved_ones = {'seyi': '+26878514450'}

        for key, value in loved_ones.items():
            message = client.messages.create(
                                        body="Dear " + key + ",\n" + fulltextmsg,
                                        from_='whatsapp:+14155238886',
                                        to='whatsapp:' + value
                                    )

        return {
            'statusCode': 200,
            'body': message.sid
        }
    except:
        return {
          'statusCode': 404,
          'body': 'Error, Bad Request'
        }
Save your Function and Test. You should get a success status and a message is sent to the registered Number.
Scheduling the Function Execution
The final part of our project is getting the function to run at scheduled time intervals (similar to using cron to run on our local development environment script). This is done through Lambda Triggers which invoke your function.
We would be using a CloudWatch event Trigger to schedule Our script to run at the specified time.
- On your Designer page, Click on
Add a Trigger - Select Cloud watch events Trigger
- On the Rule Input, Select
Create a New Rule - Enter a Rule Name
- Select the scheduled expression Rule Type
- Schedule expression - rate(2 hours)
You can create rules that self-trigger on an automated schedule in CloudWatch Events using cron or rate expressions
- Rate Expressions: Syntax rate(int time)
- Cron Expressions: same as using Unix Cron Utility
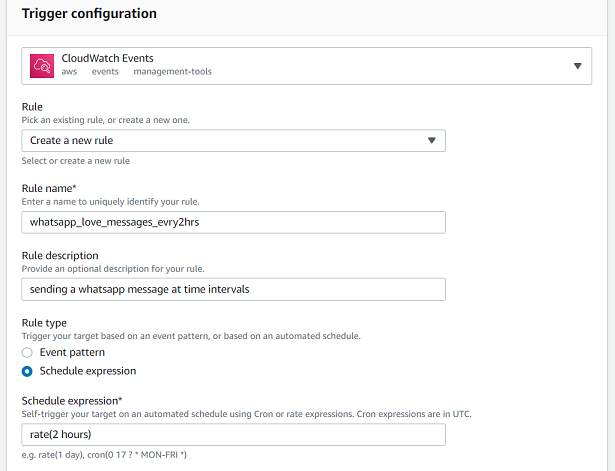
The Function should now Run at the scheduled time.
Wrapping Up
i hope this articles helps you understand better the steps to deploying a python script on the AWS Lambda service and integrating with other AWS services. Feel free to reach out if you need any help getting your script to work.
Ciao
The Source code for the article can be found here